Happy Monday crafters!
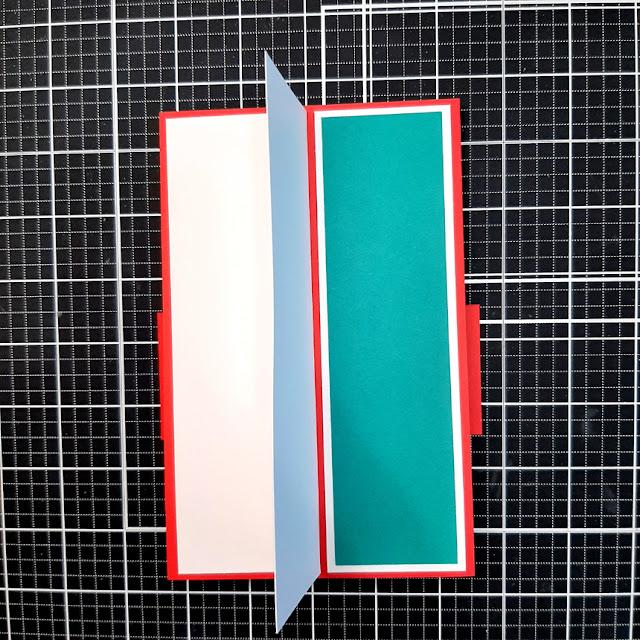
2. Add glue/tape to the top 6" portion of your 9" piece, then adhere your 7" x 4-1/4" piece on top so that the top is flush with the top of your 9" piece. *NOTE: You will have a 1" overhang at the bottom that is not adhered down. This is the BACK of your card.
5. Attach your 1-1/2" x 4" patterned paper to the 1-3/4" x 4-1/4" teal mat and attach between your 2 score lines on card front.
10. Attach your 5" x 2" red piece to that flap so the bottom of your piece is flush with the bottom of that glued piece. *NOTE: It will stick up above the glued piece by 1" and extend on each side by 1/4".
11. Attach your patterned paper that is 1-1/2" x 4-1/2" to it's coordinating teal mat and then attach to that front piece you just glued in step 10.
14. Die cut your pieces and assemble. Stamp your images and fussy cut.
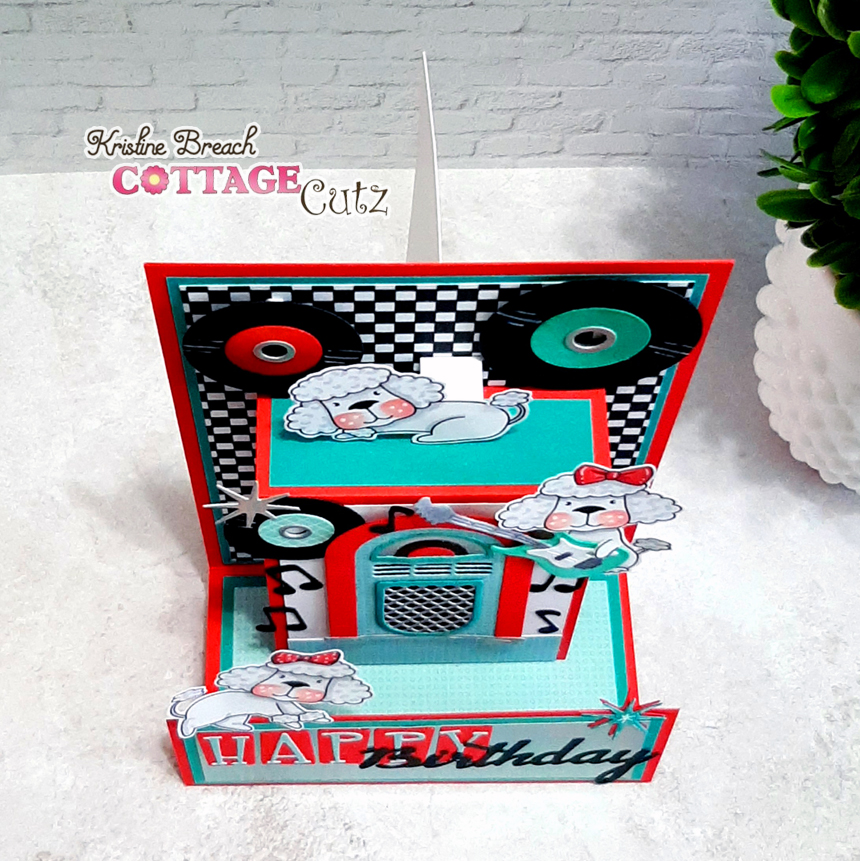
15. For one of my poodles on the top of card, I wanted to pop him out away from the back of card a bit, so I created a 1/2" cube and glued the back and bottom of cube and insert to back and top of red pop out feature, then glued my poodle to the front of the cube.
I tried a new-to-me card fold called a Stand & Pop Card! It has a kind of "kick stand" on the back that helps it to stand, and the front has a pop out feature. I've used the Fifties Jukebox, Guitar, Music Notes & Records, and Fifties Phrases #1 from the Classic Fifties Release (all of which are 40% OFF right now at the Scrapping Cottage!) along with some cute stamped images from the Poodles of Love stamp set (L4a-La Land Crafts) ♥
CUTTING & SCORING
Below is my photo tutorial with written instructions, however, if you'd like to watch a video on this style of card fold, you can watch Sam Calcott's video here.
RED CARD BASE:
• Cut a 9" x 4-1/2" - score at 1" (mountain fold) and 3" (valley fold)
• Cut a 7" x 4-1/2"
• Cut a 6-1/4" x 3" - score at 1/4", 1-1/4", and 5-1/4" - fold & burnish
• Cut a 5" x 2"
• Cut a 3" x 1" - score at 1/2" and 2-1/2" - fold & burnish
WHITE CARDSTOCK:
• Cut a 2-3/4" x 3-3/4" (layer for pop out piece)
• Cut a 4-1/4" x 6-7/8" - score in half at 2-1/8" (for back)
• Cut a 1-3/4" x 6-5/8" (for back)
TEAL CARDSTOCK MATS:
• Cut a 4-1/4 x 5-3/4"
• Cut a 1-3/4" x 4-1/4"
• Cut a 1-3/4" x 4-3/4"
• Cut a 1-1/2" x 6-3/8" (for back)
PATTERNED PAPER LAYERS:
• Cut black/white checkered paper at 4" x 5-1/2"
• Cut a patterned paper at 1-1/2" x 4"
• Cut a patterned paper (or holographic cs) at 1-1/2 x 4-1/2"
DESIGN STEPS
1. Lay your two biggest red pieces as shown below.
4. Adhere your checkered piece to the teal mat layer that is 4-1/4" x 5-3/4" and adhere to card front.
6. Attach your white piece to the middle of your 6-1/4" x 3" red piece.
7. Hold that piece so that the 1" scored section is at the bottom and apply glue to the front of that 1" section. Lay it flat onto your checkered card front so that the bottom of the part you just glued is right at the score line of card base and bring the rest of the card base up onto your glued tab and rub to secure.
8. Add glue to the front of the 1/4" tab. Fold the 1-1/4" flap backwards and with the card in folded position, attach the top of your pop out piece to the checkered back.
9. With card still in folded position, add glue to both flaps on your 3" x 1" piece and attach one flap to the very bottom of card and the other to the back of your short scored flap as shown below.
12. For the BACK of card, you can stamp inside your folded white piece, then attach just HALF of it to your card back. It should be flush with the bottom of card (oops! I missed that part!)
13. Attach your teal layer to it's white mat and adhere to the right side of card back as shown. You can cut a piece of patterned paper to that teal piece if you wish.


