This week at La-La Land Crafts, our design team created with the theme:
HALLOWEEN
(or shall I say... OWL-oween! 🤣)
I have to admit, I was stumped! I don't have Halloween stamps, so I got creative with stencils & dies. I had this really cool Cave Die, and I thought what a hoot it would be to use the Owl Builder Die and create kindof a spooky sky background!
Then... (and this is the cool part)... I thought I would make the owl swing from the top!! I got that idea from recently seeing Sam Calcott's video here. I did make some adjustments - I did not use her die set, I just hand cut & punched my own for the mechanism, but it's so easy and totally works! Swings pretty well too, I might add!
Design Steps:
1. I started with a black Top folding square card base that is 5-1/2". I then die cut the largest die from the Cave Die set from the card front.
2. I decided to add a lil stenciling on the front so I used white craft (Pigment) ink and the Harlequin Stencil from the Hearts & Harlequin Layering Syencil set around outer edges.
3. I cut a piece of white cardstock about 5-3/8" square for the inside piece.
4. I die cut a circle using the 3rd largest Stitched Nested Circles Die set and placed it where I wanted on my bg piece and then layered the tree stencil from the Tree in Bloom Layering Stencil Set to the left, slightly overlapping the circle. I then added Picked Raspberry and Wilted Violet Distress Inks with blending brushes, then misted with water. And for more interest, I spattered white paint and some of the distress inks on top.

5. Next, I die cut my pieces with the Owl Builder Die Set from 2 shades of grey, white and orange cardstock. The only part of the white die cuts I used were the eyes and I colored them with SU! alcohol markers in Parakeet Party (light & dark).
I decided I wanted bigger circles around the eyes, so I die cut the smallest die from the Double Stitched Circles set in grey cardstock and mounted behind the green eyes. For the ears, I used the ones from the Deer Builder Die set. And then I mounted him onto a Birch Tree branch. I used Copic markers to add some shading to him.
6. Now for the mechanism! I cut a piece of black cardstock to 3/4" x 3" and scored at 1/2", 1-1/2" and 2-1/2". I folded it in half and then bent the top scores to the outside. I used my Crop-o-dile to add a small brad hole about 1/8" from the center fold. I then cut a piece of acetate about 3/4" wide by 3" and cut the same size hole at the top on one end, and pushed a small brad through that hole as well as the hole in the folded black piece as shown below. ***TIP: when bending the legs of the brad flat, you want to put something near the stem first like the edge of your pokey tool and bend the legs over that. That way, the acetate will swing nicely and not be too tight!
7. Next I added Score Tape to both flaps of the black piece and attached to center inside of card, lining up the score line with the score line of your card base as shown below. I then added Score Tape to the (top side) lowest edge of the acetate arm.
8. BEFORE you attach the owl, close your card front so you can get him centered in the opening of the cave! Then add him to the pendulum! Voila!
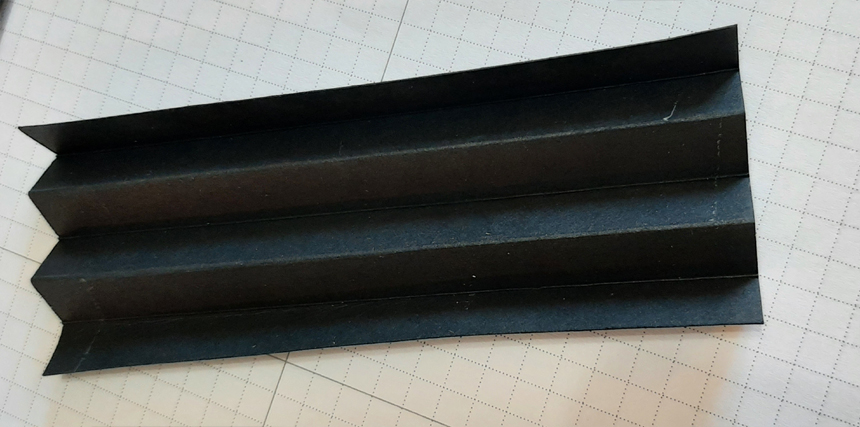
9. To help this card display nicely, I cut a piece to attach the bottom of my card pieces. I had to make adjustments from the way Sam did hers, because the Cave opening on the front was very low. So I cut my black cardstock to 5-1/2" x 3" and scored every 1/2" and accordion folded it. Then glued the ends to the inside front and back, along bottom edge.
10. I blended more of the pink and purple Distress ink onto scrap white c.s. and cut my letters using the Bold Letters and Skinny Letters Die sets and glued them onto front.
11. For the "happy", I masked the "choose to be happy" stamp from the Hey Gnomie Clear Stamp Set and die cut with the Scalloped Sentiment Labels
PRODUCTS USED:
Hey Gnomie Clear Stamp Set
Tree in BLoom Layering Stencil
Hearts and Harlequin Layering Stencils
Owl Builder Die
Deer Builder Die
Double Stitched Eggs Die
Cave Die
Birch Trees Die
Scalloped Sentiment label Die
Double Stitched Circles Die
Bold Letters Die
Skinny Letters Die
Tree in BLoom Layering Stencil
Hearts and Harlequin Layering Stencils
Owl Builder Die
Deer Builder Die
Double Stitched Eggs Die
Cave Die
Birch Trees Die
Scalloped Sentiment label Die
Double Stitched Circles Die
Bold Letters Die
Skinny Letters Die
-DISTRESS INKS-
Picked Rapsberry
Wilted Violet
Twisted Citron
-SU! BLENDS MARKERS-
Parakeet Party Light
Parakeet Party Dark
Hop on over to the La-La Land Crafts BLOG or our FB Fan Group for more inspiration!
Happy Inking!
♥ ♥ ♥
*Affiliate links may be used at no additional cost to you.


