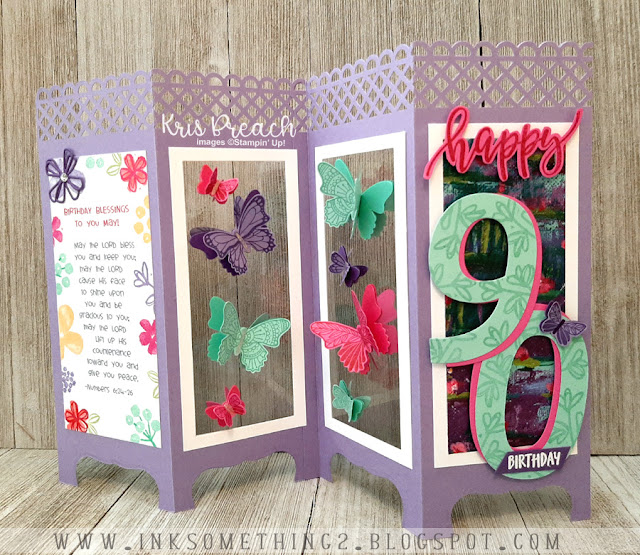
A labor of love, this card is! It's for my daughter's boyfriend's grandma who's turning 90 in a couple of weeks. ♥ I wanted to find a fancy fold so it would be extra special and this is one I hadn't tried before. The 2 middle sections are see-through and looks like the butterflies are "floating."
These butterflies are from Stampin' Up!'s 'Butterfly Gala' bundle and they work perfectly because they are symmetrical so you can easily make it double-sided and they line up! I also used SU!'s new 'Pretty Perennials' bundle - love the layering possibilities of this set!
For the butterflies... I punched out solid butterflies in a darker shade of each color (Coastal Cabana, Melon Mambo, and Gorgeous Grape). I adhered those with strong Tear n' Tape, matching up on both sides of the window sheet. Then I stamped each butterfly onto lighter shades (Pool Party, Pink Passion, Highland Heather) and only attached them in the center so their wings can be bent up and looking like they are fluttering! I also added Wink of Stella down the body of them. Here's a close up.
I followed this video tutorial by Sam Calcott, except I did change the measurements to fit a legal size (USA) envelope. It really helps if you have layered rectangle dies that fit nicely inside the panels,, which i do not,, so i had to measure and cut my own. My measurements & directions are as follows:
- Card Base: one piece of HH cardstock cut at 8 3/4" x 6 1/2", scored at 3 1/4"
- Card Base: one piece of HH cardstock cut at 8 3/4" x 6 3/4", scored at 3 1/4" and 6 1/2"
- White Frames: (4) pieces of thick white cardstock cut at 6" x 2 3/4"
- Cutting inside of those white frames you just cut; slide long side of cardstock to 5 3/4" and cut from 1/4' down to 2 1/2".
- Then turn your cardstock 90 degrees so short side is along the top and cut from 1/4" down to 5 3/4".
- Repeat steps 4 & 5 on other 2 sides.
- Cut 2 pieces of clear cardstock/window sheets just a tad smaller than the outside frame, at 5 15/16" x 2 11/16"
- Cutting out a rectangle from the base layer to make room for the windows. Cut a rectangle that is 5 15/16" x 2 11/16" out of the middle of the section that is next to the 1/4" flap, and out of just ONE of the sections on the other base piece.
- If you want a fancy border at the top of your card and/or a fancy bottom (legs/stand) punch or die cut those now, before we attach our 2 base pieces together.
- Using Tear n' Tape along the small 1/4" flap, attach the section that has window cut out (from other base piece) making sure both tops are aligned.
- Using Tear n' Tape (or other strong adhesive - but not glue!) attach your window sheet to a white frame. Now add more Tear n' Tape on top of the window sheet, following the line of the white frame and attach it to one of the window openings on your base layer.
- Turn your card over and attach another white frame on top of the window, aligning the frames so they match up.
- Repeat with other frame/window.
- Decorate your screen! My layers for remaining panels are c.s. mat = 6" x 2 3/4", and dsp = 5 1/2 x 2 1/4" (so you have 1/4" all the way around and will match your window frames)
♥ ♥ ♥
Stamps used: SU! - Butterfly Gala, Pretty Perennials
Dies & Punches: SU! - Pretty Perennials dies, Butterfly Duo punch; MS - Lattice border punch; Spellbinders - Labels 1
Paper: SU! - Lily Impressions dsp (retired); Highland Heather, Gorgeous Grape, Pool Party, Coastal Cabana, Pink Passions, Melon Mambo, Thick Basic White, So Saffron
Ink & Extras: SU! - Pool Party, Melon Mambo, Highland Heather, So Saffron, Celery; paper trimmer, Wink of Stella, glue dots, tear-n-tape, score board
♥ ♥ ♥
CHALLENGES:
I'm entering this into the SUOC270 Sky High (anything that flies)
Thanks for looking - Happy Inking *Ü*


