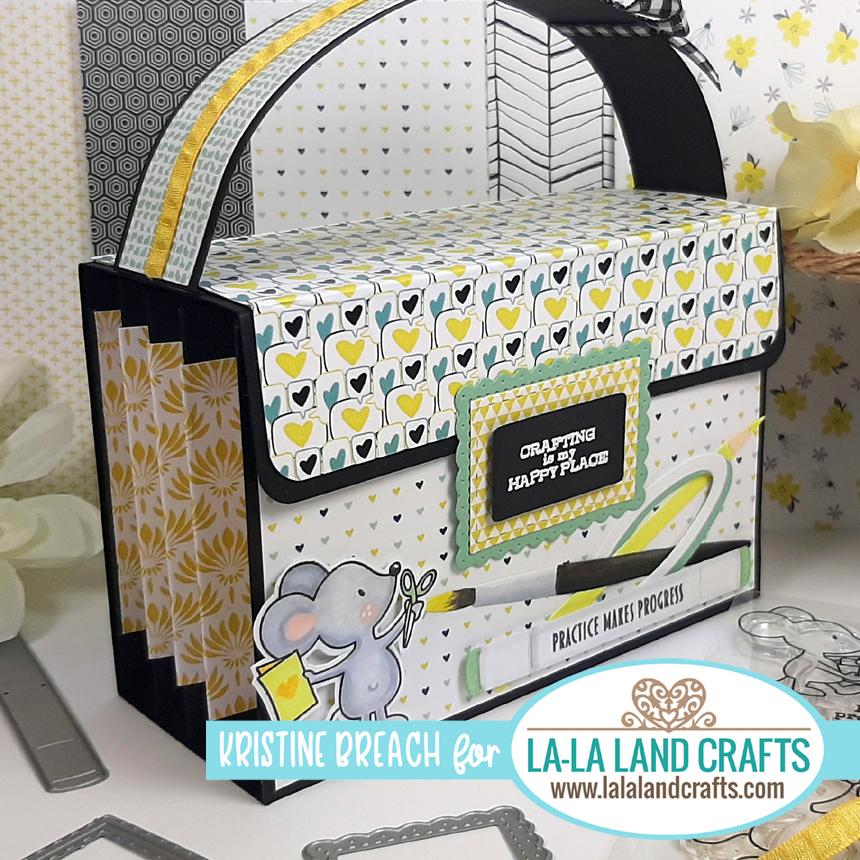
Hello - it's Inspiration Friday at La-La Land Crafts and our theme this week is 3D and I have a tutorial for you! The inspiration for my project today came out of pure necessity! Yes, it was necessary that I have something cute and functional to store my extra stamped images and die-cuts in, LOL! I normally store them in the clear stamp cases along with my stamps/dies (here) ... however, I've been on a tight budget these past few months and have not purchased what I need to even store my latest stamps & dies, so I have been storing those in their original packaging... in a box *gasp* ... I know! Crazy unorganized, I feel so out of sorts! SO... with the help of the cutest artsy/craftsy stamps & dies from La-La Land Craft's February/March Release, I made this cute li'l filing purse to store my extra stamped images and die-cuts in! It's pretty... craftsy... and functional!


*Disclaimer: I have made these before (13 yrs ago, to be exact) following a tutorial by Maria Bell, however when I clicked on the link in my blog post I realized she no longer has the tutorial available, (and I no longer have the ones I made before). So, I created my own tutorial right here as a reference for the next time I want to make one of these.
LLLC PRODUCTS USED:
COPIC COLORS:
Greys: C1, 3, 5
Yellows: Y00, 11, 15
Greens: G21, 00
Pink (inner ears/cheeks): R00
Additional Supplies Needed:
Small Magnets
Score Tape
Glue
*optional: envelope punch board (or corner rounder)
🌼 TUTORIAL 🌼
for 5-Pocket Accordion File Purse:
CUTTING & SCORING (inches):
*Note: all scoring is done by placing the long side horizontally at the top of your score board
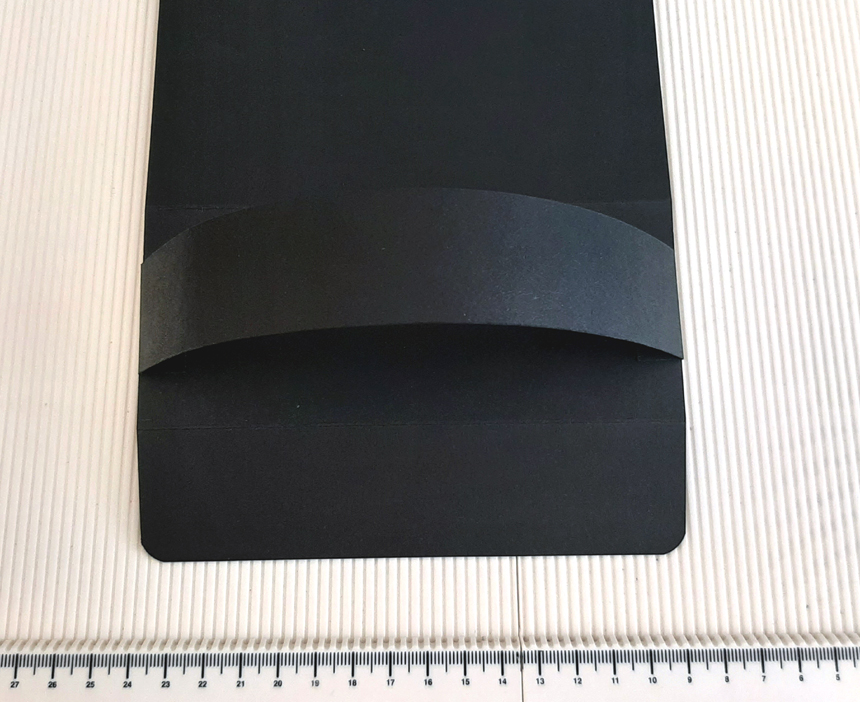
Black Cardstock:
- (1) 11" x 6" (base)
- score at 1-1/2", 4", 8", 10-1/2"
- (1) 9" x 1-1/4" (handle)
- score at 1/2" and 8-1/2"
- (1) 6" x 4" (front outside piece)
- (2) 9" x 3-7/8" (accordion sides)
- score at 1/2", 1-1/2", 2-1/2", 3-1/2", 4-1/2", 5-1/2", 6-1/2", 7-1/2", 8-1/2"
Green Cardstock (Mint Melody):
- (2 or 3) 5-3/4" x 3-7/8" (divider)
Yellow Cardstock (Daffodil Delight):
- (2 or 3) 5-3/4" x 3-7/8" (divider)
DSP - (Note to Self paper pack)
*Note: if you want to make measuring easier, you can round the "13/16" to 3/4" or the 3/16" to 1/4" - I just like the look of a li'l lesser black border.
- (1) 6" x 5-13/16" (top/flap)
- Score at 1-3/8" and 3-7/8" ---
- (1) 6" x 1-3/16" (handle)
- (1) 2" x 1-3/16" (handle)
- (1) 5-13/16" x 3-13/16" (front)
- (2) 5-1/4" x 3" (*optional (accordion sides)
- score at 1" intervals across
- (2) 3" x 3" (accordion sides)
- score at 1" intervals
INSTRUCTIONS:
- Step 1: This first step is *Optional - but if you have an envelope punch board or corner rounder, you can round the 2 edges of the black base on the 1-1/2" scored end.

- Step 2: Add Score Tape (or strong tape or glue) to the 1/2" ends of your handle.

- Step 3: Adhere the ends of your handles along the edge of the top section of your box (this section measures 2-1/2"), centering it between the scored lines. These flaps on top of your box will be covered up by the patterned paper.

- Step 4: *Optional: if you rounded the front 2 corners of your drop down flap on the base, you'll also want to round the front 2 corners of your DSP. Make sure you are rounding the correct section, should be the smallest scored end. (I used the top of my envelope maker)

- Step 5: Add glue to the backside of your DSP for the top of your box. Read step 7 before adhering!

- Step 6: Carefully slide your dsp under the handle and lining up your scores with the scores on your base, adhere the dsp down to the top, front, and back of box.
((OOPSIE! I realized after I did it, that I had scored my top dsp without paying attention to the direction of my pattern! I covered it up later. Pardon my mistake! ☺))

- Step 7: Adhere your dsp on the handle, starting at the base of handle on one end and curving your dsp as you apply it, following the natural curve of the handle. Because I used 6" paper, I will have a seam where the 2 pieces meet, but you can add ribbon to cover it up as I did.


- Step 8: With your Front piece (4" x 6") horizontal along your score board, mark the center by measuring 3 inches across and 2 inches down.

- Step 9: GLUE one magnet over that mark, then place 2 pieces of Score Tape in an "X" over it and remove backing of tape (if yours has it).

- Step 10: Adhere your dsp over that panel, on top of your magnet.

- Step 11: Place box base in front of you with the 1/2" scored flap closest to you. Fold up that flap and add Score Tape to it. Attach front piece (that you covered with magnet) to the flap, lining up the bottom edge with the fold of the scored flap.

Making the Accordion sides:
- Step 12: With the 5-1/4" x 3" dsp, and skipping the first and last 1/2" ends of the base sides, adhere dsp to the center of your accordion base sides, starting with the 1" scored section, and keeping it somewhat folded.... ie. don't flatten out the sides of your base to adhere the dsp to it! You'll want the dsp to follow the base as it's in the folded position.
*Note: If you are using the 6" paper, you will run out before the end of the base side. That's OK. You will piece it together with the 3" x 3" strip, going over the 1/4" end from the last dsp strip.
- REPEAT for 2nd side.

- Step 13: Apply Score Tape or strong glue to the LEFT SIDE of the 1/2" end of your accordion side base, and adhere to box base, along the inside of the BACK 4" tall section.
- REPEAT other side.

- Step 14: Add Score Tape or strong glue to the other 1/2" end of side and adhere to the backside of the front piece.
- REPEAT for other side.

*Notice I fixed the direction of my top DSP? ☺

- Step 15: Mark the top center of each divider at 2-7/8" then align the 3rd from the smallest layering circle die (1-1/2") over your mark, centering it in the middle of your die and cut.
- REPEAT for all dividers

- Step 16: insert your dividers into box. You could have as many as 5 dividers for a total of 6 sections, or you can have as few as 3 dividers for 4 sections. Your preference.

- Step 17: You will want to add some kind of a drop-down piece for your closure like I have (can be any shape) and add your other magnet in the same way as before. I glued my magnet between the green scalloped piece and the yellow DSP. Then I popped my sentiment piece on top. *BEFORE YOU ADHERE YOUR CLOSURE to your box/purse.... BE SURE to place your closure piece directly over the other magnet (on the front of box) so they are connected well, and then put your box in closed position and adhere JUST the UPPER part of your closure piece to the front flap of your box lid. This way you know you've got it in the correct spot.
- DECORATE as you wish! I used the cute mouse from the Makers Gonna Make Clear Stamp Set along with the Coloring Dies for an artsy/craftsy themed box. (All products are linked above - just before my tutorial).
WANT MORE INSPIRATION?
Hop on over to the La-La Land Crafts BLOG or our FB Fan Group to see what the rest of the Design Team has been creating!
Happy Inking!
♥ ♥ ♥
*This post may contain affiliate links at no cost to you. It just means that if you click a product link and purchase that product, I will receive a small kick-back % of the sale. Thank you so much for considering shopping my affiliate links!