Hello again! I'm back with 2 more box cards using some brand new stamps and dies from the upcoming SU! Holiday mini catalog & SAB and a tutorial on how you can make these without using special dies!
First I'll show you a card that uses special dies that make it super quick & easy to create the basic box base to showcase all your fun images, and then I will show you how you can make a very similar card without using the dies.

This is a fun new stamp set featured in the upcoming SU! Holiday Mini Catalog called "Penguin Place" - I bought the bundle, so it has a punch that goes with it to punch out the sitting/standing penguin outline, the white inner piece, and the feet. I had to fussy cut the trees, gifts, hats & scarves and the sliding penguin. This is one set I wish they had made a die set to match for all those smaller pieces.
The Box base is created with dies by My Favorite Things called "Outside the Box Level Up Die-namics".


and they fold flat for mailing! *Note, it's not pushed down into the envelope yet, but it does fit! :)

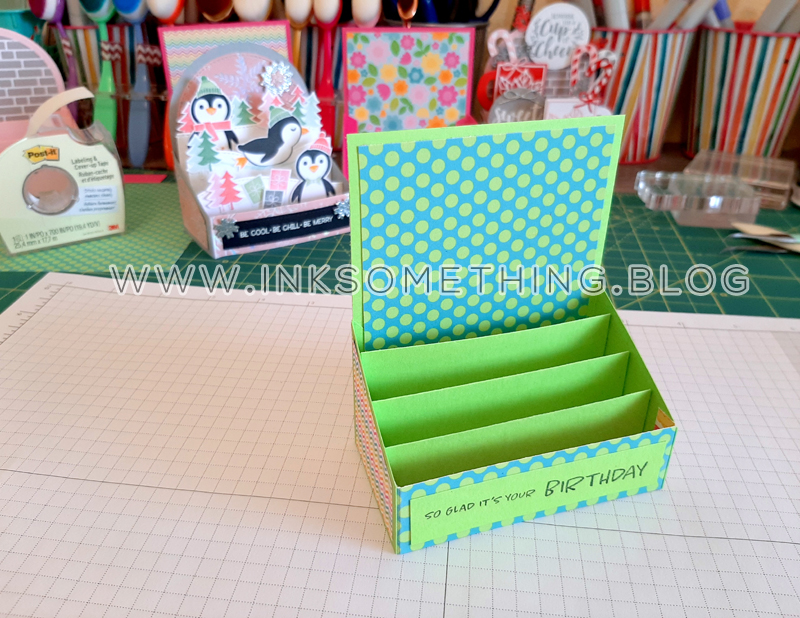
Layered Box Card Tutorial
(this post has lots of photos to help you out)

BACK:
1) CUT a piece of cardstock for the back standing part of your card 4 1/4" x 3 1/2"
2) CUT a piece of patterned paper 4" x 3 1/4" - do not adhere to the back yet!!!
FRONT:
3) CUT a piece of cardstock OR patterned cardstock for the front piece 4 1/4" x 1" and SCORE 3/8" in from both sides.
4) CUT a piece of coordinating c.s. or dsp to layer on top of front piece 3 1/4" x 3/4"
SIDES:
5a) CUT 2 pieces of cardstock same color as your back base 2 3/8" x 2"
5b) SCORE just one side of each of those pieces at 3/8" so that the larger section is now 2"x2" (see photo above)
5c) Measure the side opposite of the score line and make a pencil mark at 1". CUT diagonally from the pencil mark to the scored line in the corner (see photo above). For the 2nd piece, turn it the other direction so that the score line is on the opposite side before measuring the 1" mark. (see photo above)
*Optional: If you want to layer a fun patterned paper or different color cardstock to your side pieces continue with step 6. Otherwise skip to step 7.
6a) CUT 2 pieces of dsp or c.s. 1 3/4" x 1 3/4" square.
*IF you are using a pattern that has a direction like my chevron pattern in photo, make sure you are measuring on the SIDEs of pattern, not top/bottom for this next part.
6b) Measure on one side 7/8" and put a pencil mark. CUT diagonally from that mark up to the opposite corner.
INSIDE LAYERS:
7) CUT 3 or 4 pieces of cardstock that will be placed in the center of your box to add your images to, 4 1/4" x 3/4" and SCORE 3/8" in from both ends. Then cut tabbed angles off of the top 2 ends (see photo below)

How to Assemble your box


5) If you haven't done it yet, you can stamp and/or emboss the front layer of your front piece as in my photo above. DO NOT glue the other end to the side yet!! :)

6) For the inside tabbed layers, start by gluing just the left side (or whichever side you glued your front piece to) of your tabbed layer so that the edge of your tab meets up to the scored line of your side piece (see photo above). Make sure that you keep the top of this first layer just below the top of your side piece. DO NOT attach the right side yet!

7) It will depend on how many layers you want to add inside your box. I did 3. So I spaced evenly my 3 layers between the scored line and the edge of my front 1" piece tab, AND you want to bring each layer down just a little bit so it's more graduated. Glue or tape that 2nd layer in place. DO NOT attach the other end! (see next photo)

8) Now that all 3 of my layers are attached on the left side, I added some glue (or strong tape) to the tabs on the other end.

9) Holding those down, close the other side piece on top of your glued inside layers and hold a bit til dry enough to stay in place.

10) Now you can attach the other end of your front piece by gluing (or strong tape) and folding the tab INSIDE the front of your side piece, matching up edges.
WHA-LA!! Your card base is done and ready to decorate! 😀

♥ ♥ ♥
Stamps: (ITD) - Counting Sheep; Penguin Place (both coming SOON)
Dies & Punches: (MFT) - Outside the Box Level Up dies; Slimline Grassy Hills Die-namics; (SU!) - Counting Sheep dies - coming soon in the Aug. SAB catty
Paper & Ink: (SU!) - Basic White cardstock; (Paper Pumpkin) - Silver Glitter cardstock elements; Versamark ink pad; (Doodlebug Design Inc) - Spring Garden double-sided cardstock; Flirty Flamingo, Certainly Celery, Soft Soafoam, Smokey Slate, Classic ink pads; Memento Tuxedo Black ink pad (MFT) - Limelight cardstock & ink cube
Extras: (SU!) - Stampin' Dimensionals; White embossing powder; (Copic & Artist's Loft) - alcohol markers; (?) - white gel pen
~ Happy Inking :)